Event Properties
The Event properties allow you to assign actions to Elements, which will be executed when predefined conditions (called 'Events') occur within a form at runtime. For example, Events include a Button being clicked or tapped, the contents of a text box changing and a page being displayed. If an action or JavaScript function is assigned to an Event and the Event is triggered at runtime, the assigned action or function will be run and hence the actions associated with it will be performed.
The Events properties can be found under the Events tab,  , in the Properties Pane when an Element's or a page's properties are displayed in this Pane and look like this:
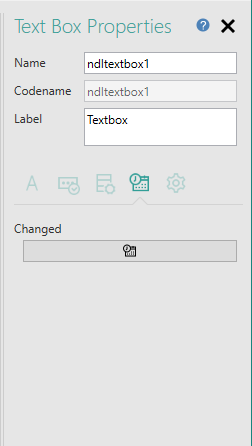
The Events available vary, depending upon the type and functionality of the Element. For example a Button will have a 'Clicked' Event because the point of a Button is that the user 'clicks' it to do something, whereas a Text Box has a 'Changed' Event so that you could potentially validate user input when the contents of the box changes because a user types something in it.
To display the properties for a page, if the page is currently displayed in the Form Design workspace, click anywhere on the background of the page outside any Elements, otherwise select the page in the Project Explorer's Pages tab. The page properties will be displayed in the Properties Pane.
To display the properties for an Element, select the Element in the Form Design workspace.
You can assign actions to an Event by choosing from a list of predefined actions or by coding your own JavaScript. To do this click on the  button under the Events tab.
The Event Builder pop-up will be displayed:
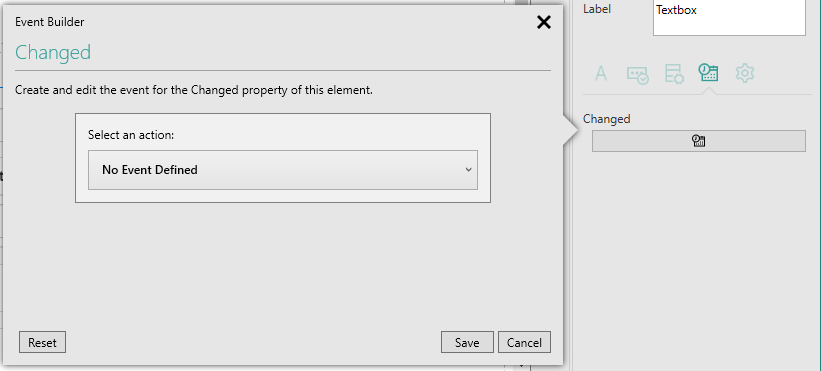
If you haven't assigned an action to this Event, the pop-up will display No Event Defined as shown in the picture above.
To assign an action to the Event, click on the drop-down box:
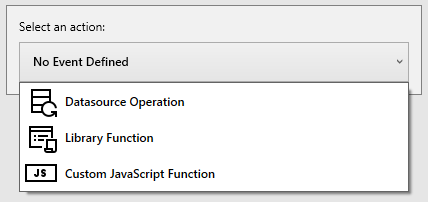
Choosing Datasource Operation allows you to specify an action related to Datasources:
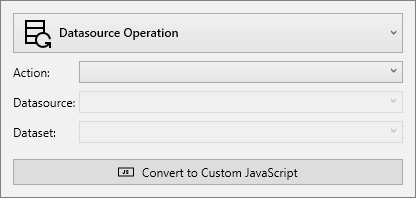
Drop-down the Action list to display a list of possible actions:
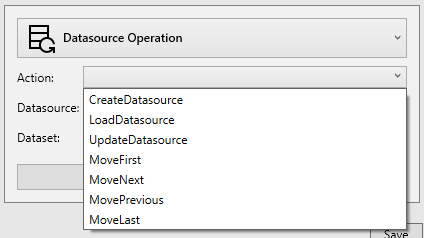
Select the action you want to assign to this Event from the list.
You can then specify the Datasource and Dataset you want your specified Action to act upon in the Datasource and Dataset fields below the Action field.
CreateDatasource will create a new blank record in your selected Datasource and clear the values in all input mapped Elements on the form, except Recordset Elements which will only be cleared if they are NOT input mapped. Before creating the new record, the current record will be updated with values from any Elements which are output mapped to the selected Dataset.
Note that if you want to reset all the Elements on a form, you can use the Reset form option available from the Event property's Library Functions option instead.
- You cannot write to a read-only Dataset, i.e. a Dataset which has no Primary Key. If you select a Datasource in the Datasource list which has any read-only Datasets, these will not be included in the Dataset list.
- In addition, you cannot specify a child Dataset which is in a managed relationship with another Dataset. In this case, child records will be created by the parent Dataset when required. Child Datasets will also be omitted from the Dataset list displayed here.
Digitise Forms Datasources and Imported Datasources:
For these Datasources, LoadDatasource will download the specified records from a named Datasource, make the first record the current record and automatically update the value(s) displayed in any Elements which are input mapped to the specified Dataset.
Imported Stored Procedures which return a result set:
Executes the Stored Procedure, makes the first record in the returned result set the current record and automatically updates the value(s) displayed in any Elements which are input mapped to the specified Dataset.
Selecting LoadDatasource as the required action, will display two additional field, Query and Error Handler Function, after the Dataset field:
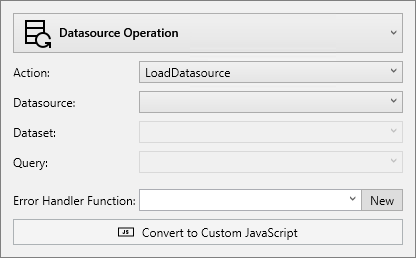
The Query option allows you to select a SQL query from the queries configured within your chosen Dataset, to specify which records are to be downloaded.
If the SQL query you select includes parameters, an additional field for each parameter will be displayed. The parameters will begin with '@', e.g.:
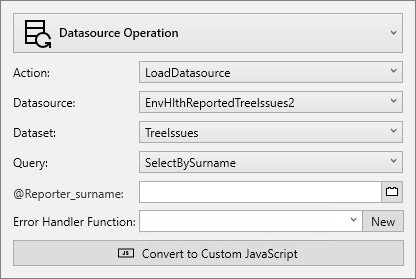
The parameters are used at runtime to provide search criteria for the query, e.g. to specify that only records relating to 'John Smith' or only records between specified dates should be downloaded. In the picture above, the query is designed to allow the user to enter a person's surname and then download all records relating to that surname. Parameters provide placeholders in the search criteria which will be filled in later when the query is run. In the case of a Digitise Forms form, the value to be used to replace the placeholder will be taken from one of the Elements on the form. Consequently, here you need to tell Digitise Forms which Element will provide the value to be used. In the case of our surname example, you need to tell Digitise Forms which Element will contain the surname you want to download records for.
If you always want to use a set value, you can type the value directly in the parameter field - e.g. if you will only ever want to download records for the surname 'Smith', you can type Smith into the text box.
Alternatively, if the value will be supplied by the user when filling in the form, you can specify here which Element on the form will contain the required value at runtime. To do this, click on the  button at the end of the field to display the following extra fields:
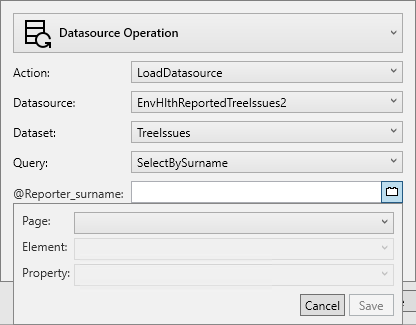
Select the page in your form on which the Element is located in the Page field.
Then select the Element itself in the Element field.
Finally, select the property of the Element which will contain the required value, from the Property field. If an Element has more than one property available in this field, you may need to experiment to see which property contains the required value as different properties may obtain their values from different aspects of the Element.
Click on the Save button to save your changes or on the Cancel button to discard your changes.
Your specified Element property will be displayed in the field in the format <page>.<element>.<property>. If you want to change your selection here, click on the  button again to redisplay the options. You can delete your current selection by clicking on the
  button at the end of the field.
This option allows you to specify a JavaScript function to be used to display error messages if a problem occurs whilst downloading data with this instance of LoadDatasource. By default, if a problem occurs at runtime, no error message will be displayed and so this option allows you to provide error messages if required.
Datasource errors are only displayed if enabled under the form properties by selecting the Display Error Messages property. If enabled, you can specify an error handler function here to display the actual error message.
A default error handler function is supplied as standard and you can use this function by leaving this option blank. You can then specify the message to be displayed in the Default Error Message property, again under the form properties. As long as datasource errors are enabled, should an error occur during a download, the default error message will be displayed. Note that the default error message will be used for all data download and database update errors where you don't specify a customised function and so isn't specific to this particular instance of LoadDatasource.
If you want a more specific message, e.g. to provide information or instructions relevant to this particular data download, you can edit the default error handler function or create your own bespoke function for this download and then specify the function name here. The New button will generate a JavaScript template error handler function and then load the custom JavaScript file in an editor allowing you to customise it to your requirements. If you select an error handler function from the drop-down list of existing error handler functions, this button will change to Edit. Clicking the button will open the custom JavaScript file to allow you to edit the specified function.
- If you click on the New button and the Display Error Messages property in the form properties is not currently selected, it will be selected automatically and, if the default onDatasourceError function hasn't previously been generated, the function will be generated and added to the custom JavaScript file before opening the Script file.
For more information about specifying custom error messages for data downloads see Display Datasource Error Messages.
When you have finished, click on the Save button again to save your changes and dismiss the Event builder pop-up or on the Cancel button to close the pop-up and discard your changes.
The Reset button will clear the settings in the pop-up and set the pop-up back to its default values.
If you save your assignment the Event property will change to indicate the action assigned to the Event:

You can reload the Event builder pop-up to edit your action assignment by clicking on the property's  button.
- Remember, in order to download a Dataset, you need to enable read access for the Dataset by selecting the Allow Read Access property in the Dataset's properties.
UpdateDatasource will update the current record in the specified Datasource from the current values in all Elements on the form which are output mapped to the specified Dataset and then automatically refresh the values displayed in any Elements which are input mapped to that Dataset.
-
You cannot use Imported Stored Procedures which return a result set with this action - in order to execute these you need to use the LoadDatasource action (see above) or call loadDatasource in a custom JavaScript. Imported Stored Procedures which only perform inserts and updates and Stored Procedures used with Digitise Forms Datasources can be executed using UpdateDatasource, providing you have output mapped Elements to them.
Selecting UpdateDatasource as the required action, will display an additional field called Error Handler Function after the Dataset field:
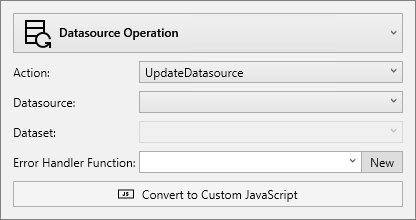
This option allows you to specify a JavaScript function to be used to display error messages if a problem occurs whilst updating data with this instance of UpdateDatasource. By default, if a problem occurs at runtime, no error message will be displayed and so this option allows you to provide error messages if required.
Datasource errors are only displayed if enabled under the form properties by selecting the Display Error Messages property. If enabled, you can specify an error handler function here to display the actual error message.
A default error handler function is supplied as standard and you can use this function by leaving this option blank. You can then specify the message to be displayed in the Default Error Message property, again under the form properties. As long as datasource errors are enabled, should an error occur during a download, the default error message will be displayed. Note that the default error message will be used for all data download and database update errors where you don't specify a customised function and so isn't specific to this particular instance of UpdateDatasource.
If you want a more specific message, e.g. to provide information or instructions relevant to this particular data update, you can edit the default error handler function or create your own bespoke function for this download and then specify the function name here. The New button will generate a JavaScript template error handler function and then load the custom JavaScript file in an editor allowing you to customise it to your requirements. If you select an error handler function from the drop-down list of existing error handler functions, this button will change to Edit. Clicking the button will open the Script file in an editor allowing you to edit the specified function.
- If you click on the New button and the Display Error Messages property in the form properties is not currently selected, it will be selected automatically and, if the default onDatasourceError function hasn't previously been generated, the function will be generated and added to the custom JavaScript file before opening the Script file in an editor.
For more information about specifying custom error messages for data updates see Display Datasource Error Messages.
- You cannot write to a read-only Dataset, i.e. a Dataset which has no Primary Key. If you select a Datasource in the Datasource list which has any read-only Datasets, these will not be included in the Dataset list.
- In addition, you cannot specify a child Dataset whose parent Dataset has its Submit Related Data property selected. In this case, child records will be created by the parent Dataset when required. Child Datasets will also be omitted from the Dataset list displayed here.
- Remember, in order to write to a Dataset, you need to enable write access for the Dataset by selecting the Allow Write Access property in the Dataset's properties.
Moves to the specified record in the Dataset and makes that record the current record. All Elements which are input mapped to the specified Dataset will automatically be updated from the current record.
Click on the Save button to save your changes or on the Cancel button to discard your changes.
In order to specify an action relating to a Datasource, you must first have defined the required Datasource. For more information about Datasources and Datasets refer to the
With all actions, you can customise the action to extend its basic functionality if you want to, by editing the JavaScript function for the Event. To do this click on:

to generate a JavaScript function in the Script file for the action and load the Script file in an editor, allowing you to edit the JavaScript to include your required customised actions.
For information about editing the JavaScript functions refer to
Choosing Library Function lets you assign an action from a range of non-database related functions:
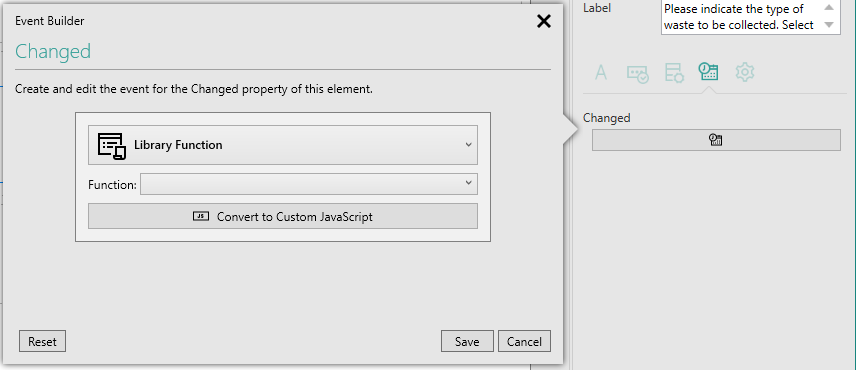
Drop-down the Function list to display a list of actions relating to the form, navigation and local data storage:
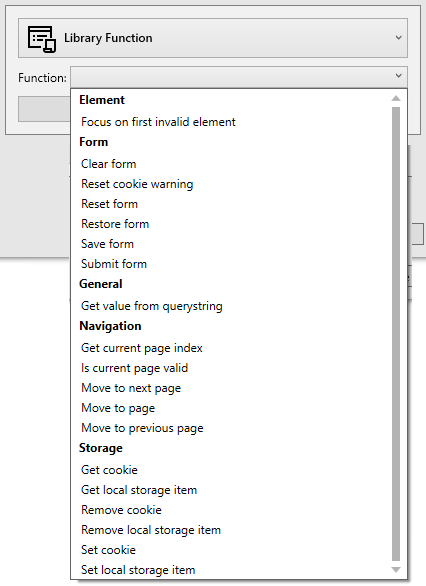
Select an the action from the list.
Some actions require you to add extra information in order for the action to be performed, e.g. Save and Restore form, Move to page, Set cookie. To do this you need to convert the action into a custom JavaScript function and then edit the function in the custom JavaScript file.
Choosing Save form or Restore form will automatically generate a skeleton JavaScript function and then load the custom JavaScript file in an editor.
For other actions where you need to add information, e.g. to specify the page to move to with Move to page, you will need to open the custom JavaScript file manually after choosing your action by clicking on:

This will generate a skeleton JavaScript function for the action, add it to the bottom of the Script file and display the file in an editor so that you can edit the action.
- The Script file contains all your custom JavaScript for the form which means that once you have added a function to the file, you can later view or edit that function by opening the Script file from any Element or from the Projects tab in the Project Explorer. You must, however, initially add the function through the Element to which it belongs.
Other actions, such as Reset form and Move to previous page, do not require additional configuration and you don't need to generate a JavaScript function to perform these actions. However, with all actions, you can always customise the action to extend the basic functionality of the action, if you want to. To do this click on:

to generate a JavaScript function in the Script file for the action and load the Script file in an editor, allowing you to edit the JavaScript to include your required customised actions.
For information about editing the JavaScript functions refer to the
For information on what an individual action does and how to edit its function within custom JavaScript, if relevant, click on the action in the List of Functions
- If you want to use Move to next page, Move to page or Move to previous page the behaviour of these actions may be influenced by the setting of each page's Nonsequential property. This property controls whether the pages making up your form must be accessed in sequence when at least some of the Elements on your form have validation rules assigned. In this situation, you can use the property to allow some pages to be accessed out of sequence and this can affect the operation of the page movement actions. For details of how they may be affected refer to the following scripting function descriptions: Move to Next Page, Move to Page or Move to Previous Page, respectively.
Choosing Custom JavaScript Function allows you to write your own custom JavaScript function to be assigned to this Event and run when the Event is triggered at runtime. You can add any standard JavaScript to your function providing you with the opportunity to fully customise the actions performed when the Event is triggered.
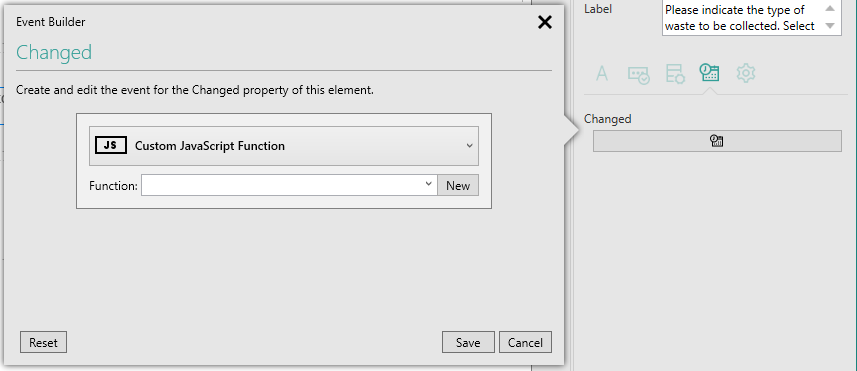
If you have previously written one or more JavaScript functions, you can assign an existing function to this Event, providing that if it has already been used elsewhere it is suitable for use here as well without requiring any changes.
To assign an existing function, click on the down arrow at the right-hand end of the Function edit box to drop-down the list of current functions and choose the required function from the list.
To write a new function for this Event, click on the New button. The custom JavaScript file will be opened in an editor and a new empty skeleton JavaScript function will be added to the end of the file for you to edit. By default, the function will be named:
<page name>_<element name>_<event type>_<n>
where <n> is a consecutive series of numbers added to the end of the name to ensure a unique name for this function. The first function you create for a particular Event won't have the _<n> on the end but if you later create a second function for the same Event, _2 will be appended to the name, a third one will have _3 and so on.
This function will automatically be assigned to the Event, and will be displayed in the Event property in the Properties Pane:

You can clear the current function assignment by right-clicking on the property in the Properties Pane and choosing Clear value. This will clear the assignment but doesn't delete the function from the Script file in case you have also used the function elsewhere or have cleared the property by mistake. If you then click the New button under the Custom JavaScript Function in the Event Builder again, a new function will be created with the same name but with the next number in sequence, e.g. _2, added to the end.
To view or edit the function, click on the  button to redisplay the Event Builder pop-up and then click on Edit to open the Script file. If you select a different function in the Function drop down before you click Edit, this function will automatically be assigned to the Event property replacing the original function specified here.
Remember, however, that once you have added a function to the Script file, you can edit the function whenever the Script file is open, however you open it.
For more information about adding custom JavaScript see the
